
Printable Pigpen Cipher Chart
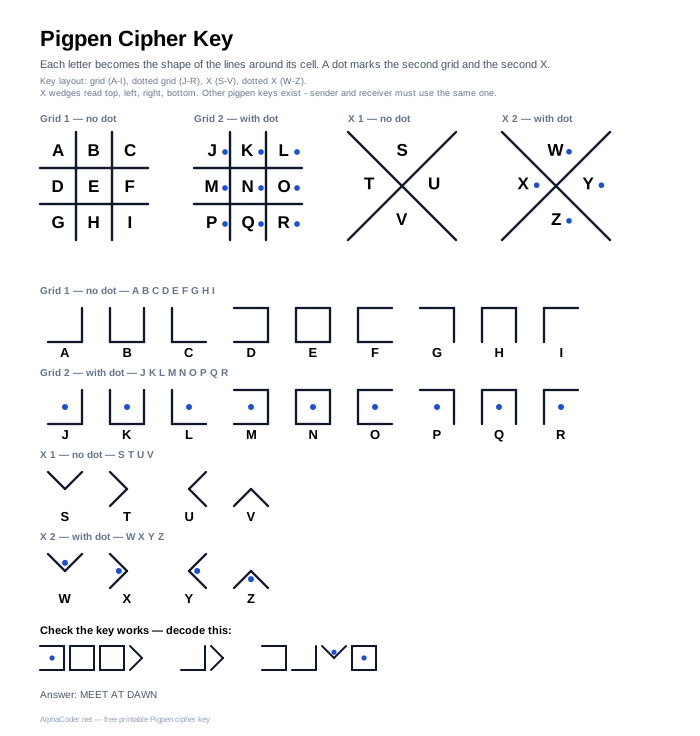
The full Pigpen (Freemason) cipher key: two tic-tac-toe grids and two X grids covering all 26 letters. Print the PDF, grab the SVG for a poster, or read the whole key as a table below — every symbol is described in words as well as drawn, so it works without images.
There is more than one pigpen key
Pigpen has no single official alphabet. Some books order the sections grid, X, grid, X; others fill the grids backwards or shuffle the letters entirely. This chart uses the traditional layout, stated plainly so you can check it against whatever your class or book uses: Key layout: grid (A-I), dotted grid (J-R), X (S-V), dotted X (W-Z). X wedges read top, left, right, bottom. Other pigpen keys exist - sender and receiver must use the same one.
Where each letter lives
A letter’s symbol is simply the lines that surround its cell. That is the whole cipher — once you can picture the four sections, you can write it from memory.
Grid 1 — no dot
A B C D E F G H I — nine cells of a tic-tac-toe grid, read left to right, top to bottom.
Grid 2 — with dot
J K L M N O P Q R — nine cells of a tic-tac-toe grid, read left to right, top to bottom, each symbol marked with a dot.
X 1 — no dot
S T U V — four wedges of an X, read top, left, right, bottom.
X 2 — with dot
W X Y Z — four wedges of an X, read top, left, right, bottom, each symbol marked with a dot.
All 26 symbols
Grid 1 — no dot
| Letter | Symbol | How to draw it |
|---|---|---|
| A | Lines on the bottom and right (top-left cell of the grid) | |
| B | Lines on the bottom, left and right (top-centre cell of the grid) | |
| C | Lines on the bottom and left (top-right cell of the grid) | |
| D | Lines on the top, bottom and right (middle-left cell of the grid) | |
| E | Lines on the top, bottom, left and right (middle-centre cell of the grid) | |
| F | Lines on the top, bottom and left (middle-right cell of the grid) | |
| G | Lines on the top and right (bottom-left cell of the grid) | |
| H | Lines on the top, left and right (bottom-centre cell of the grid) | |
| I | Lines on the top and left (bottom-right cell of the grid) |
Grid 2 — with dot
| Letter | Symbol | How to draw it |
|---|---|---|
| J | Lines on the bottom and right (top-left cell of the grid), plus a dot | |
| K | Lines on the bottom, left and right (top-centre cell of the grid), plus a dot | |
| L | Lines on the bottom and left (top-right cell of the grid), plus a dot | |
| M | Lines on the top, bottom and right (middle-left cell of the grid), plus a dot | |
| N | Lines on the top, bottom, left and right (middle-centre cell of the grid), plus a dot | |
| O | Lines on the top, bottom and left (middle-right cell of the grid), plus a dot | |
| P | Lines on the top and right (bottom-left cell of the grid), plus a dot | |
| Q | Lines on the top, left and right (bottom-centre cell of the grid), plus a dot | |
| R | Lines on the top and left (bottom-right cell of the grid), plus a dot |
X 1 — no dot
| Letter | Symbol | How to draw it |
|---|---|---|
| S | V shape, opening upward — the two upper arms of the X (top wedge) | |
| T | > shape, opening to the left — the two left-hand arms of the X (left wedge) | |
| U | < shape, opening to the right — the two right-hand arms of the X (right wedge) | |
| V | Ʌ shape, opening downward — the two lower arms of the X (bottom wedge) |
X 2 — with dot
| Letter | Symbol | How to draw it |
|---|---|---|
| W | V shape, opening upward — the two upper arms of the X (top wedge), plus a dot | |
| X | > shape, opening to the left — the two left-hand arms of the X (left wedge), plus a dot | |
| Y | < shape, opening to the right — the two right-hand arms of the X (right wedge), plus a dot | |
| Z | Ʌ shape, opening downward — the two lower arms of the X (bottom wedge), plus a dot |
Check the key works
Before you hand a key out, decode something with it. These symbols are generated from the table above, so if they read correctly the whole chart is consistent.
Answer: MEET AT DAWN
Using it in class
- The printable PDF includes a blank practice grid at the bottom — students write a message, swap sheets, and decode each other’s.
- Pigpen is a substitution cipher, so letter frequency still gives it away. That makes it a good lead-in to why encoding is not encryption.
- For a number-based code that needs no symbol drawing, use the Morse code chart or an Atbash worksheet.
- More classroom-ready printables: secret codes for kids.